WL WN577A2 AC750 Extender Setup
Live Chat
Live Chat With Experts and Get Real-Time Responses.
Let’s Talk
Don’t Wait, Then You Can Call Us Right Away.
By doing the WL WN577A2 AC750 extender setup, you can easily and quickly boost the range of your existing router. Study the below information, to enjoy the feature of this Wavlink extender device. Let’s dive into the process.
Specification Of WL WN577A2 AC750 Extender
- It performs on IEEE802.11a/b/g/n/ac standards.
- This model number of the Wavlink extender provides a 1×10/100Mbps auto-negotiation ethernet LAN and WAN port.
- Simultaneously, it supports 433Mbps in 5GHz and 300Mbps in the 2.4GHz band.
- AC750 Wavlink extender supports WPA-PSK/WPA2-PSK security encryption.
WL WN577A2 AC750 Extender Setup Benefits
- It eliminates all the dead point areas of your home and office.
- The configuration process of this AC750 Wavlink extender model number is so easy.
- The AC750 Wavlink extender device supports dual frequency 2.4GHz and 5GHz bands.
- You can easily pair this Wavlink extender with any host router.
- It extends the range of the router’s WiFi signals in a short period of time.
Sign-In To Wavlink AC750 Extender
Before doing the WL WN577A2 AC750 extender setup process, initially do the login process. Read the below instructions step by step to do the login process.
- To begin with, attach your Wi-Fi-containing gadget to your Wavlink_EXT network.
- Further, in WiFi-containing gadgets open navigation and enter the web address wifi.wavlink.com in the analysis bar.
- Soon, the Wavlink extender login page appears on your screen.
- Insert all the relevant information which is shown on the login page.
- Moreover, now you will successfully login into the Wavlink AC750 extender.
Perform WL WN577A2 AC750 Extender Setup
Through two methods you can easily do the configuration process of the Wavlink AC750 extender
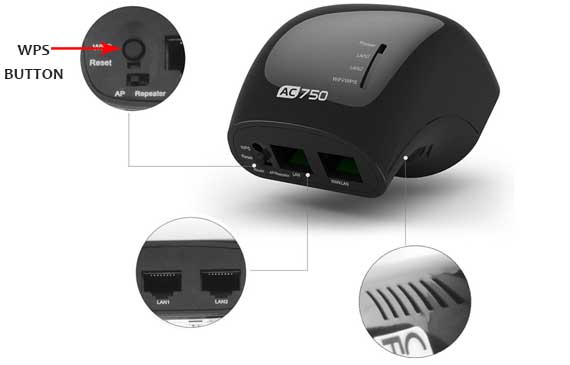
By Pushing Extender And Router WPS Button
Note: Verify that your existing router must have the WPS button. If your router does not support this WPS button, you will need to change the old one to a new one. Otherwise don’t waste your crucial time on this method and try another method, if you don’t want to change your old router.
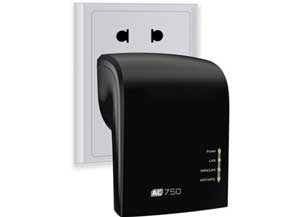
- In an electrical socket first, place the Wavlink AC750 extender plug.
- Now, near the host router locate your Wavlink AC750 extender.
- After that, press the router and AC750 extender WPS button for a short while.
- Later doing all this, a solid blue LED starts blinking which means the extender and router are successfully linked with each other.
- Hence, the WL WN577A2 AC750 Extender setup is done.
Attach AC750 Extender To Router Via Ethernet Cable
- First, grasp on long ethernet wire and connect it to the extender ethernet port.
- Now, connect the router LAN port to the remaining end of the wire.
- Verify that your AC750 Wavlink extender must be connected to the computer.
- After that, open navigation and enter an IP address 192.168.10.1 in the address field.
- Now, on the extender setup page fill in all the required crucial details and make a new login password for protection. Then, tap on next.
- Following this, pick configure wizard. Choose the SSID of your router and insert the security password.
- Afterward, wait for a while to see the solid blue LED on both the AC750 extender and host router.
- In the end, take out the plug of the AC750 extender from the wall plug and place it in the location where you want to get high internet speed.
Note: After the WL WN577A2 AC750 extender setup if you are facing slow internet speed, then follow the lower clarification tips.
- Verify the gap between the Wavlink AC750 extender and router.
- Replace all the damaged wires with new ones.
- Change the placement of your Wavlink AC750 extender and host router gadget.
- Remove the extra gadgets which connect to the extender network.
- Upgrade the internet connection plan.
If these tips do not solve your WL WN577A2 AC750 extender setup issue then observe and read carefully the below advanced clarification tips.
Additional Tip 1: Improve Wavlink AC750 Extender Firmware
- First, open the Wavlink extender login page.
- Now, fill in all the relevant details one by one.
- Further, pick the administration option, and below that choose the firmware improvement option.
- In the end, wait for a short while to download the upgrade firmware file on your laptop or computer.
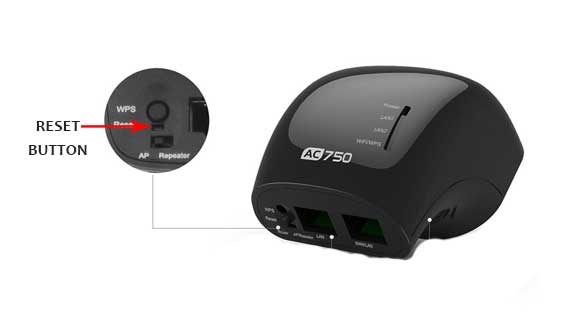
Additional Tip 2: Reset AC750 Wavlink Extender
- At the back side of the Wavlink AC750 extender, you can see the reset hole button.
- Now, insert the hairpin in the reset hole button.
- Make sure you don’t insert the hairpin with pressure. Otherwise, your Wavlink extender device will be damaged.
- Further doing this, all the LEDs of the Wavlink AC750 extender will turn off.
- Moreover, it means your Wavlink AC750 extender gadget will now completely reset.
Note: After doing the reset method, you will need to do the WL WN577A2 AC750 extender setup process again.
With the help of these few solutions if your WL WN577A2 AC750 extender issue is not solved then you will need to contact us. We will assist you to fix the extender issue in a short period. You can easily contact us by e-mail at [email protected] and by a phone number 716-992-6371
Common Wavlink Extender Setups
Some Issues You Might Face
If you are facing any issues then please contact us, and we will be happy to help you.
Wavlink Customer Service