A Complete Guide to wifi.wavlink.com Login & Setup
Fast | Secure | Hassle-Free
Instant Support
Call : 24/7
Experience Swift Solution by Our Tech Wizards
Complete Guide to wifi.wavlink.com Login & Wavlink Setup
wifi.wavlink.com is the official web portal used to configure, manage, and log into any Wavlink networking device — including routers, range extenders, outdoor access points, and HALO mesh systems. Whether you’re doing a fresh wavlink setup, accessing your admin panel, or troubleshooting a connection issue, this guide walks you through every step.
What Is wifi.wavlink.com?
wifi.wavlink.com is the default web-based management portal (also accessible via IP address 192.168.10.1) for all Wavlink networking devices. By navigating to http://wifi.wavlink.com in any browser, users can access the device admin dashboard to:
Requirements Before You Begin wifi.wavlink.com Setup
Before starting the wifi.wavlink.com setup or wifi.wavlink.com login process, make sure you have the following:
| Requirement | Details |
|---|---|
| Wavlink Device | Router, Extender, Outdoor AP, or HALO system |
| Power Source | Wall socket with functioning power supply |
| Client Device | PC, laptop, tablet, or smartphone |
| Web Browser | Updated Chrome, Firefox, Edge, or Safari |
| Ethernet Cable | For wired connection during initial setup (recommended) |
| Login Credentials | Default: Username — admin / Password — admin (check device label) |
| Host Internet | Working modem or ISP connection (for router setup) |
Pro Tip: Always use a wired Ethernet connection during the initial wavlink setup to avoid dropped connections mid-configuration.
Wavlink Hardware Setup — Step by Step
Before accessing wifi.wavlink.com, complete the physical hardware installation. Follow these steps regardless of whether you are configuring a Wavlink router, extender, or outdoor AP:
Once complete, you are ready to access wifi.wavlink.com for login and configuration.
How to Access wifi.wavlink.com Login Page
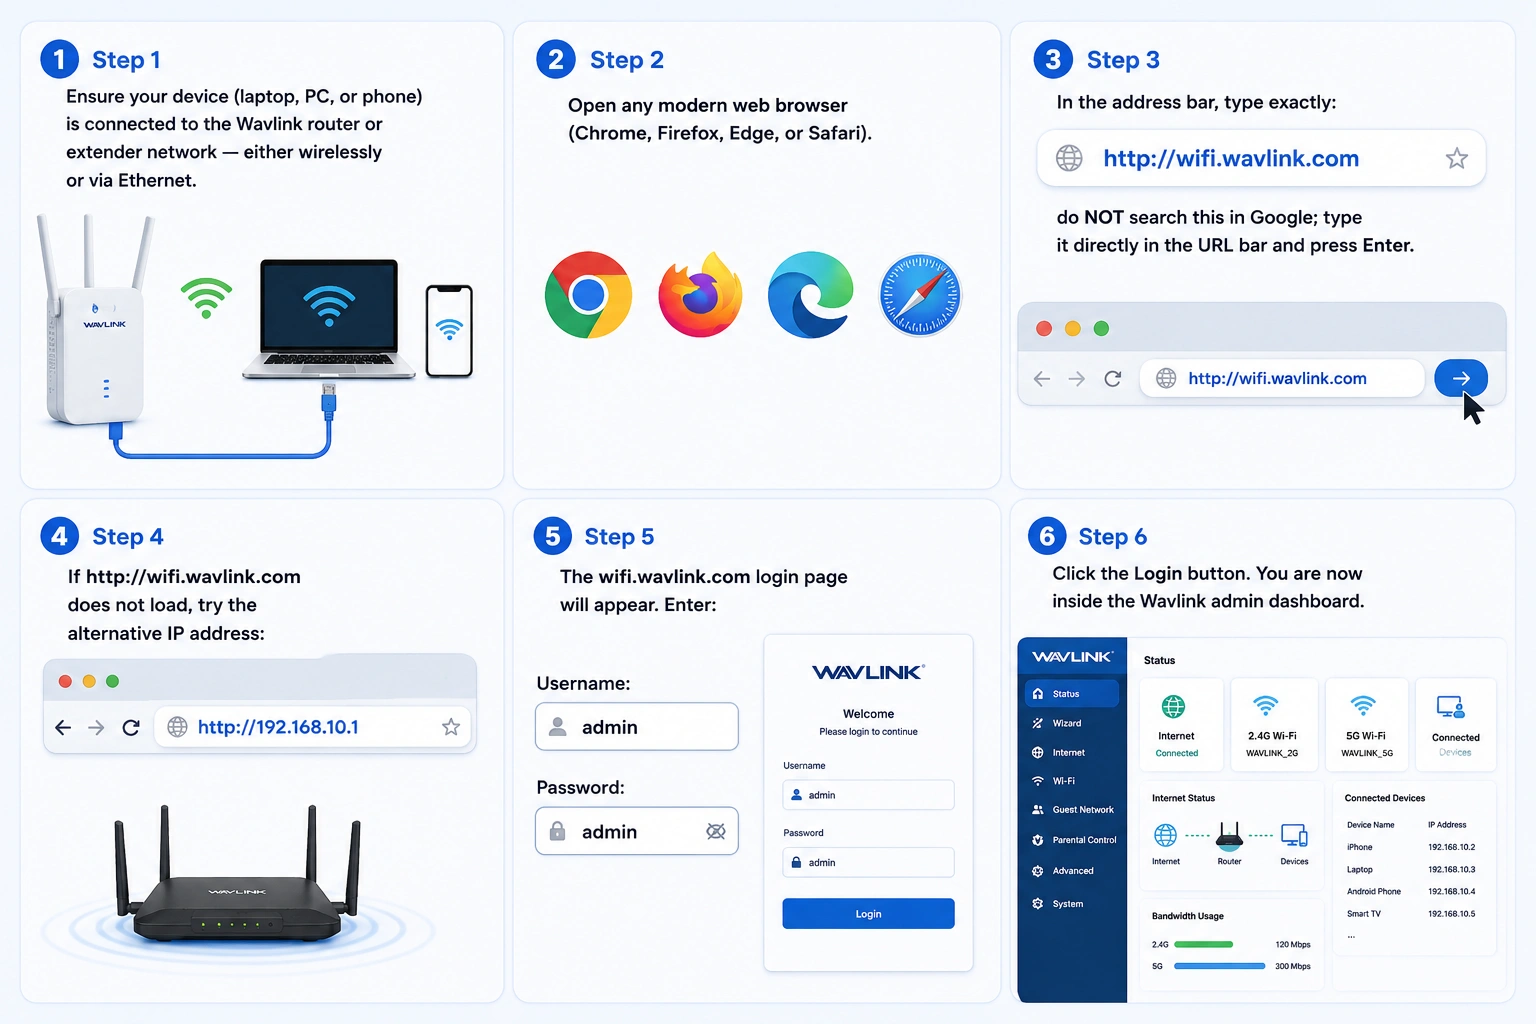
The wifi.wavlink.com login page is the gateway to your device’s admin panel. Here is exactly how to access it:
Complete wifi.wavlink.com Setup Guide
Once logged in via wifi.wavlink.com, follow the configuration steps for your specific device type.
Wavlink Router Setup via wifi.wavlink.com
After completing the wifi.wavlink.com login, the setup wizard launches automatically.
Wavlink Extender Setup via wifi.wavlink.com
The wifi.wavlink.com setup process for extenders extends your existing router’s coverage area:
WPS Method — Quickest Wavlink Setup Option
If your existing router supports WPS (Wi-Fi Protected Setup):
Managing Your Network via wifi.wavlink.com
After completing the initial wavlink setup, use the wifi.wavlink.com admin panel regularly to manage your network:
wifi.wavlink.com Troubleshooting — Common Issues & Fixes
Having trouble with wifi.wavlink.com or your wavlink setup? These are the most common issues and their solutions:
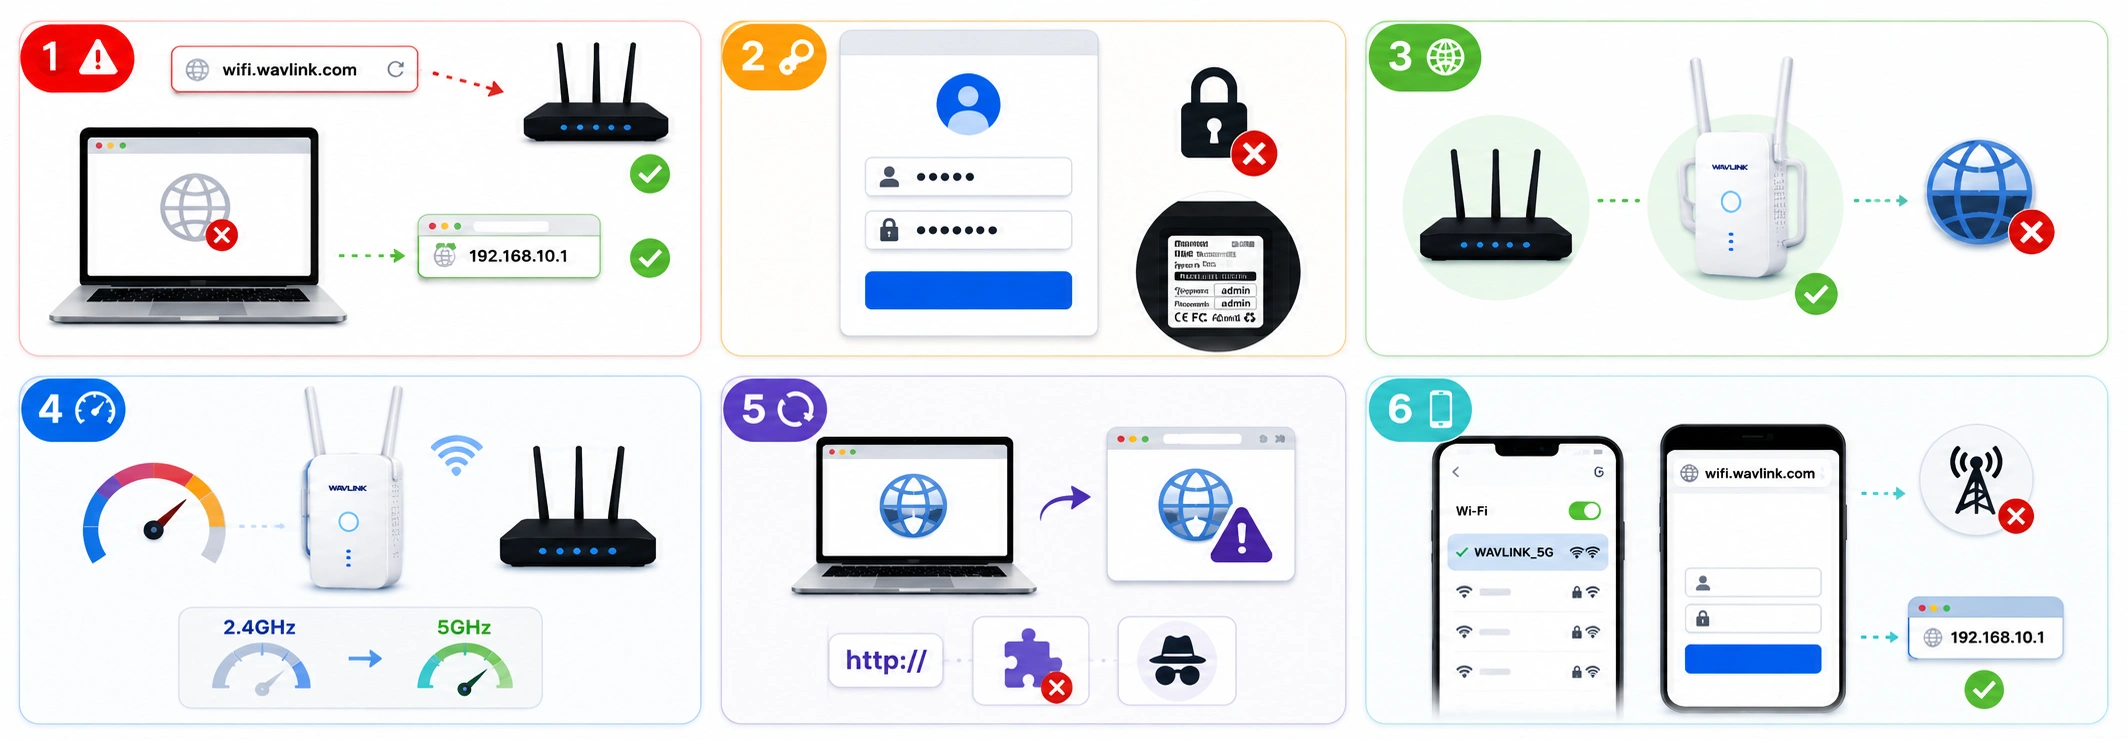
⚠️ Issue 1: wifi.wavlink.com Page Not Loading
Fix:
- ✅ Confirm you are connected to the Wavlink device’s network (not a different WiFi).
- ✅ Type the URL directly in the address bar — not in a search engine.
- ✅ Try the IP alternative: http://192.168.10.1
- ✅ Clear your browser cache and cookies (Ctrl+Shift+Delete).
- ✅ Disable VPN or proxy if active.
- ✅ Try a different browser or device.
🔑 Issue 2: Login Credentials Not Working
Fix:
- ✅ Confirm you are using the default credentials (admin/admin or check the device label).
- ✅ If you changed the password and forgot it, factory reset the device.
- ✅ Hold the Reset button for 10–15 seconds until the LED flashes, then try default credentials again.
🌐 Issue 3: Extender Connected but No Internet
Fix:
- ✅ Ensure the extender is within range of the main router.
- ✅ Re-enter the router’s WiFi password carefully in the setup panel.
- ✅ Reboot both the router and extender.
- ✅ Check if the router’s DHCP is enabled.
🐌 Issue 4: Slow WiFi Speed After Setup
Fix:
- ✅ Reposition the extender — too far from the router causes weak signal relaying.
- ✅ Switch to the 5 GHz band for faster speeds (shorter range).
- ✅ Update firmware via wifi.wavlink.com → Advanced → Firmware Update.
- ✅ Reduce interference by keeping the device away from microwaves and cordless phones.
🔄 Issue 5: Redirecting to Wrong Page
Fix:
- ✅ Use http:// (not https://) — the admin page does not use SSL.
- ✅ Disable browser extensions that redirect HTTP traffic.
- ✅ Use incognito/private browsing mode.
📱 Issue 6: Cannot Access from Mobile
Fix:
- ✅ Connect your phone to the Wavlink WiFi network first.
- ✅ Type the full URL http://wifi.wavlink.com in the mobile browser’s address bar.
- ✅ Disable mobile data while connected to Wavlink WiFi to prevent routing conflicts.
- ✅ Alternatively, use http://192.168.10.1.
wifi.wavlink.com Setup for Popular Models
Here is a quick reference for wavlink setup across the most popular device models:
| Model | Setup URL | Default IP | Default Login |
|---|---|---|---|
| Wavlink AC600 | http://wifi.wavlink.com | 192.168.10.1 | admin/password |
| Wavlink AC750 | http://wifi.wavlink.com | 192.168.10.1 | admin/password |
| Wavlink AC1200 | http://wifi.wavlink.com | 192.168.10.1 | admin/password |
| Wavlink AC1300 | http://wifi.wavlink.com | 192.168.10.1 | admin/password |
| Wavlink AC2100 | http://wifi.wavlink.com | 192.168.10.1 | admin/password |
| Wavlink AX1800 | http://wifi.wavlink.com | 192.168.10.1 | admin/password |
| Wavlink AC3000 | http://wifi.wavlink.com | 192.168.10.1 | admin/password |
| Wavlink HALO Series | http://wifi.wavlink.com | 192.168.10.1 | admin/password |
| Wavlink BE5100 (WiFi 7) | http://wifi.wavlink.com | 192.168.10.1 | admin/password |
All models support wifi.wavlink.com as the primary access URL. If it doesn’t load, use the IP address listed above.
Frequently Asked Questions (FAQ)
Q1: What is wifi.wavlink.com used for?
wifi.wavlink.com is the local web-based admin portal for all Wavlink routers, range extenders, access points, and HALO mesh systems. By visiting this URL in a browser while connected to the Wavlink device’s network, users can log in to the admin dashboard to perform the initial wavlink setup, change network passwords, update firmware, manage connected devices, and troubleshoot connectivity issues.
Q2: How do I access the wifi.wavlink.com login page?
To access the wifi.wavlink.com login page: (1) Connect your device to the Wavlink WiFi network or via Ethernet, (2) Open a browser and type http://wifi.wavlink.com in the address bar, (3) Press Enter — the login screen appears, (4) Enter the default credentials (username: admin, password: admin), and (5) Click Login. If the URL doesn’t load, try the alternate address http://192.168.10.1.
Q3: What are the default login credentials for wifi.wavlink.com?
The default wifi.wavlink.com login credentials for most Wavlink devices are: Username: admin and Password: admin. Some models may have the password left blank by default. These details are also printed on the label on the bottom or back of the device. After logging in for the first time, it is strongly recommended to change both the WiFi password and the admin password.
Q4: How do I complete the wifi.wavlink.com setup for a new extender?
To complete the wifi.wavlink.com setup for a Wavlink extender: (1) Power on the extender and connect your device to its default WiFi network, (2) Open a browser and navigate to http://wifi.wavlink.com, (3) Log in with admin/admin, (4) Select your existing router’s WiFi network from the list, (5) Enter the router’s password, (6) Configure the extender’s SSID and password, (7) Save settings and reboot, (8) Relocate the extender to extend coverage.
Q5: Why is wifi.wavlink.com not opening in my browser?
If wifi.wavlink.com is not loading: (1) Ensure you are connected to the Wavlink device’s network, (2) Confirm you typed http://wifi.wavlink.com directly in the address bar (not a search engine), (3) Try the IP address http://192.168.10.1 instead, (4) Clear browser cache and disable VPN or proxy, (5) Try a different browser in incognito mode, (6) Reboot the Wavlink device and retry.
Q6: What is the IP address for the wifi.wavlink.com portal?
The alternative IP address for the wifi.wavlink.com admin panel is 192.168.10.1. If the URL http://wifi.wavlink.com does not resolve in your browser, typing http://192.168.10.1 directly into the browser’s address bar will load the same login and setup page.
Q7: Can I do the wavlink setup without a computer?
Yes. The wavlink setup can be done from a smartphone or tablet. Connect your phone to the Wavlink device’s WiFi network, turn off mobile data, open a browser, and go to http://wifi.wavlink.com. The setup wizard works the same on mobile browsers. Alternatively, download the Wavlink WiFi app from the App Store or Google Play for a guided mobile setup experience.
Q8: How long does the wavlink setup take?
The complete wavlink setup — including hardware installation, accessing wifi.wavlink.com, and configuring network settings — typically takes 10 to 20 minutes for most users following step-by-step instructions. If you experience connectivity issues or need to troubleshoot, the process may take up to 30 minutes. Our expert team can help you complete the setup in the shortest possible time.
Q9: How do I reset my Wavlink device if I forgot the admin password?
If you cannot access the wifi.wavlink.com login page due to a forgotten admin password, perform a factory reset: (1) Locate the small Reset button on the device (pinhole), (2) Use a pin or paperclip to press and hold it for 10–15 seconds while the device is powered on, (3) Release when the LED flashes or the device reboots, (4) The device returns to factory defaults, (5) You can now log in using the default admin/admin credentials and complete the wifi.wavlink.com setup again.
Q10: How is wifi.wavlink.com different from the Wavlink app?
wifi.wavlink.com is a browser-based local admin interface accessible only when you are connected to the Wavlink device’s network. The Wavlink WiFi app is a mobile application that can offer remote management capabilities. Both allow you to configure wavlink setup settings, but the web portal at wifi.wavlink.com typically provides more advanced configuration options, including firmware updates and detailed security settings.
Q11: Does wifi.wavlink.com work for all Wavlink models?
Yes. wifi.wavlink.com is the universal admin URL that works for virtually all Wavlink networking devices, including WiFi 4 (N300, AC600), WiFi 5 (AC750, AC1200, AC2100, AC3000), WiFi 6 (AX1800, AX3000), WiFi 7 (BE5100, BE3600), HALO mesh systems, outdoor access points, and powerline adapters. The same URL http://wifi.wavlink.com is used for login and setup across all these models.
Q12: What should I do after completing the wifi.wavlink.com setup?
After completing your wavlink setup via wifi.wavlink.com: (1) Change the default admin username and password immediately, (2) Update the device firmware if an update is available, (3) Enable WPA2 or WPA3 encryption on your wireless network, (4) Set a strong and unique WiFi password, (5) Configure a guest network if needed for visitors, (6) Note down your new login credentials in a safe place. These steps ensure your network is secure after setup.
Need Help with wifi.wavlink.com Setup?
If you are experiencing trouble completing the wifi.wavlink.com setup or cannot access the wifi.wavlink.com login page despite following all the steps above, our certified technical experts are available around the clock to help you.
Our team can remotely assist you with:
