
Wavlink WiFi Repeater Setup
Wavlink wifi repeater device is the best option to get rid of wifi dead zone trouble. If you are facing a dead zone issue in your current networking system then add wavlink wifi repeater and resolve it. You can extend the network coverage even outside your home with the help of wavlink outdoor wifi repeater setup. Confused how to set up the wavlink repeater device? Don’t know how to proceed with the wavlink wifi repeater setup? Then you reach the right page, further you will find detailed wavlink wifi repeater instructions to add the device into your existing network. Let’s begin the setup.
Wavlink Repeater Setup Requirements
As per the wavlink repeater manual you need following information along with the items to complete the setup process. Gather everything required and then initiate the Wavlink WiFi Repeater Setup:
If you have all such items then you can proceed further and follow wavlink wifi repeater instructions to add the device into your current network.
Wavlink Repeater Setup Manual Guide
Along with the repeater device you will find Wavlink Repeater Setup Guide in the box. This setup guide is very important for you. In this guide you will find several important pieces of information about your device. You can check the standard credentials to open the Wavlink WiFi repeater setup page in this guide. If you are unable to understand the information specified in this manual then you can read the instructions we specified further.
Wavlink Repeater Setup Process
The Wavlink wifi repeater setup process is not formidable at all. Anyone can add the device to their network using any of the two methods. The first and foremost method is the WPS method. In this method you can configure the device quickly but cannot customize it. This method is preferred by the new users who don’t know about networking at all. The other method is a web based method which involves technical steps. Proceed with this method to make customization to your network.
Setup Wavlink Repeater Via WPS
Your host networking device must enable WPS connection to proceed with the WPS based Wavlink wifi repeater setup. Here are the steps you have to proceed with to complete the process:
The WPS method is also applicable for wavlink outdoor wifi repeater setup, making it ideal for users who want connectivity in gardens, garages, or patios. With the correct placement, you can extend your internet beyond indoor boundaries.
Setup Wavlink Repeater via Web
To proceed with the web based wavlink wifi repeater setup, you need to choose a client device. When the client device is decided then you can proceed with the following instructions as per the wavlink wifi repeater manual to complete the setup:
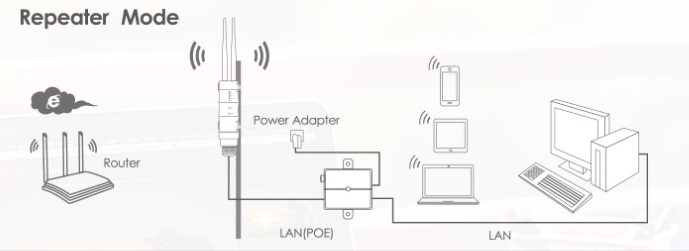
Power Up Repeater
First of all you have to power up the device using the power adapter you received with it. In case the device is wall compact design based then connect it directly to the power. Keep the device closer to the host networking device to avoid trouble.
Connect To Repeater Network
The next step of the setup process is to connect the client device to the repeater’s standard network. Standard network information is specified on the device label. Also you can opt for ethernet cable based connection instead of wireless connection.
Access Wavlink Repeater Login Page
Proceed to access the wavlink repeater login page to initiate the setup. For this you need to launch the browser and specify the IP in the URL bar. As the page appears using the standard login information you can access the page.
Configure Wavlink Repeater
Once you get the access, choose the mode as wavlink repeater mode and then proceed as instructed by the screen. As per the wavlink repeater manual, you need to choose the host network and enter its password. After that, secure your repeater’s network by changing its standard details. In addition to this must replace the admin account standard login credentials to secure your network. Don’t forget to check for the wavlink repeater firmware update.
Finalize Setup & Test Network
Once all the changes to the network have been done from your side, press the save button. Let the device reboot itself to apply changes and then test the network. Disconnect the client device to the repeater network and again connect it using the new formed details. Check the speed along with the coverage of the repeater network. Relocate it to another place to boost performance.
Common Errors & Their Troubleshootings
While performing the wavlink Repeater Setup you might encounter common errors faced by numerous users. If any of them came in front of you then don’t worry just follow the troubleshootings as we mentioned.
Unable To Access WiFi Setup Page
The first and most common problem that most of the users face is unable to access the Wavlink WiFi repeater setup page. There are several reasons for this issue. The primary reason why this issue arises is devices not connected to the Wavlink WiFi. Mistakenly the users connect the client device with the other network because of which they say trouble in connecting to the server. So you have to be sure that your device is connected with the correct network.
Another reason that creates trouble in accessing the page is the incorrect web address. While entering the address most of the users type the address correctly which leads to trouble. So be very careful while entering the web address.
Lastly your browser cache files might create issues in accessing the setup page. If this is the reason then you have to clear your browser cache and then try to get the access. If any of them troubleshooting doesn’t work for you then you need to restart your device and then try it might help you.
Wavlink Repeater Not Connecting To Main Router
Many users also face that their Wavlink repeated device fails to connect with the primary router device while performing the Wavlink wifi Repeater Setup. This happens because the user who is trying to connect the device might use the wrong WiFi password of the router device. So while entering the password of your router device to connect the repeater, make sure you are not making any mistake. Be careful and type the password accurately.
In addition to this users may face trouble because their repeater device is placed two far from the router device. So if you are facing trouble in connecting both the devices then you have to keep them a bit closer so that your repeater is able to receive the signals from the router.
Further if yet the issues not resolve then the problem might be with your router’s signal. In case the router signal is weak then you have to face this to make sure your router is properly working and broadcasting WiFi. If the trouble persists then connect your service provider.
No Internet After Wavlink Repeater Setup
Are you facing trouble and have no internet connection even after connecting with the repeater device? It’s so then this may be because of an incomplete setup process or IP conflict or your Wi-Fi signal being between repeater and router. These are the possible reasons because of which you are not delivering internet access. To resolve this issue you have to reset the repeater device and complete the setup again. Also you can relocate the repeater device and move it closer to your router device. If the problem process then try rebooting your repeater and router device and then check it again. In case the problem is not resolved yet then you have to check whether your router is supplying Internet to the repeater or not. Connect a device directly to the router to verify your router has internet access or not.
Connect Us
Wavlink wifi repeater setup using web or WPS is a simple and easy to proceed task. The above breakdown will help in performing the setup. If you desire to perform wavlink outdoor wifi repeater setup then proceed with web based setup as it allows you to customize the network. In case you encounter any trouble while performing the setup then you can connect our tech experts. An expert can help you better to resolve the trouble. Further they assist you in completing the setup process. So, what are you waiting for? Call Now!
FAQs on Wavlink WiFi Repeater Setup
The WPS method is quick and simple, while the web method allows you to customize settings like network name, password, and firmware updates.
The LED indicators will confirm successful pairing. This method is best for beginners.
Log in using the default credentials, select Repeater Mode, choose your WiFi network, enter its password, and save changes.
For the best performance, use the web-based setup so you can customize settings for stronger coverage.
Always save and reboot after changes.