
Wavlink BE3600 Setup
Wavlink is totally killing it with its networking devices. Now it has come up with a powerful gaming router, BE3600. It offers high-speed connectivity, and you can easily use it in multiple modes. So if you also got your hands on it or are thinking of investing in it, then this post will lend you a helping hand. The post covers the complete feature set of this powerful gaming router as well as steps for Wavlink BE3600 router setup. The router is fully loaded with advanced features, and the installation process is also quite straightforward and simple. So with no further unnecessary delay, let’s first highlight the key features of the BE3600 router.
Key Features
Firstly, the Wavlink BE3600 setup operates on dual frequency bands and the latest wifi 7 standards. Its 2.4Ghz band offers speeds of 688Mbps and its 5Ghz band offers speeds of 2882 Mbps. So both bands, when combined, offer total speeds of 3600Mbps.
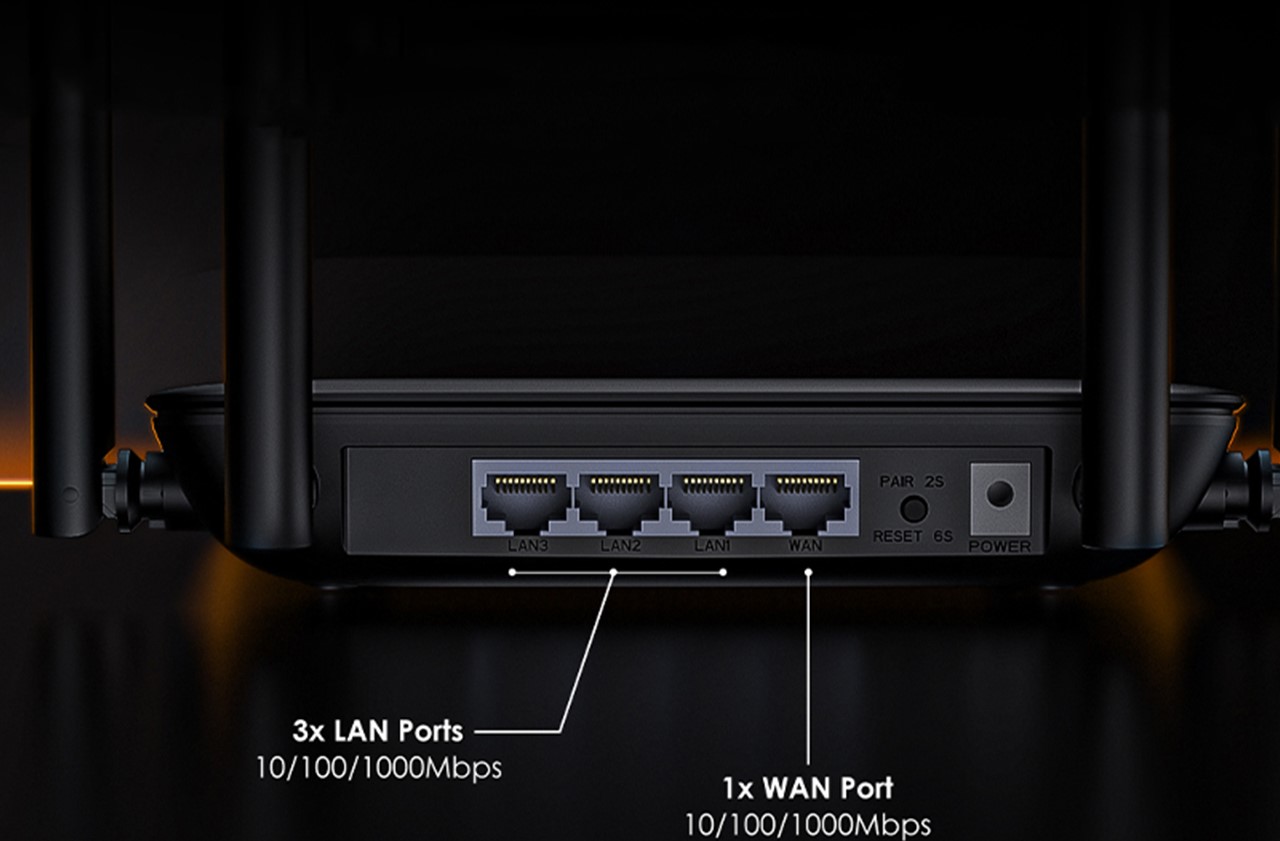
Next up, the BE3600 router features not one but three Ethernet ports (LAN). So the gaming enthusiasts can directly pair their gaming consoles to the router for better stability and dependability. Moreover, the router features four 5dBi high-gain antennas. So, wider and stable coverage is what you can expect from the Wavlink BE3600 router setup.
Now comes the main concern of every individual these days, which is security. When it comes to security, Wavlink won’t disappoint. So the Wavlink BE3600 gaming router features all these security encryptions:
- WPA2-PSK
- WPA1-PSK/WPA2-MIX
- WPA3-SAE/WPA2-PSK
- WPA/WPA2-Enterprise
So again, peace of mind is guaranteed when it comes to security.
Further, the Wavlink BE3600 setup inhibits both MU-MIMO and beamforming technology. With MU-MIMO, you can connect multiple devices to the router all at once, and there will be no connectivity problems like lag or buffering. Whereas the beamforming technology doesn’t scatter the signals unnecessarily in areas where they aren’t needed. Rather, it focuses the signals to your connected devices. So the best networking experience is what you get with the BE3600 router.
Moving ahead, the router gives access to features like a guest network and parental control. It also inhibits OFDMA technology.
Setup Essentials
To make the Wavlink gaming router setup process smooth, keep the following ready:
If you tried conducting the BE3600 router setup, but the end results were not what you expected, then first reset the router and only then follow the setup guidance below.
Installation Guidance
First, you have to strategically keep the router in the correct space. Choose a spot that you consider the center of your place, or in an area where you operate most of your smart gadgets. The chosen spot must be open, must offer ventilation, and should have minimal physical barriers. Do not place the device in a box, behind any object, near electronic gadgets, or close to metals. Try to position it in high elevations. With all these strategies,s the Wavlink BE3600 setup outcome will turn out to be favourable.
Setup Steps
✓ Start by fetching an Ethernet wire. Pair it to the upstream device, which has a link to the internet source. Now move its second side into the BE3600. Next, grab the power cable. Link it to the router. Thereafter, move it into a well working switch board. As the hardware is now assembled, you can turn on the power switch.
✓ Moving further, after the router completes its initial starting process, take a smart gadget. Link it with the BE3600. One way to do so is using ethernet wire. But if you do not want any extra wiring hassle with your Wavlink BE3600 setup, then activate wifi. And now connect wirelessly using the details that are written on the base of the BE3600 router.
✓ On the networked gadget, now open the internet browser. You can use any compatible up-to-date browser like Chrome, Safari, Edge, and internet explorer, for that matter. Head to the URL blank. Without any mistake, type any of these two addresses:
✓ After you input the information, tap the Enter key. Now fill in the security key. It is “admin”. With that, hit Login. Now choose the WAN type and hit Next. Thereafter, pick the region, time zone, and fill in the other asked information. Once filled, tap on Save and then wait for the refresh option to pop up. As it pops up, click on it. Fill in the new details that you just created and tap on Login to wrap up the Wavlink BE3600 setup.