logo
192.168.10.1 Login

Using http //192.168 o 10.1 Login: Setup & Customize Network

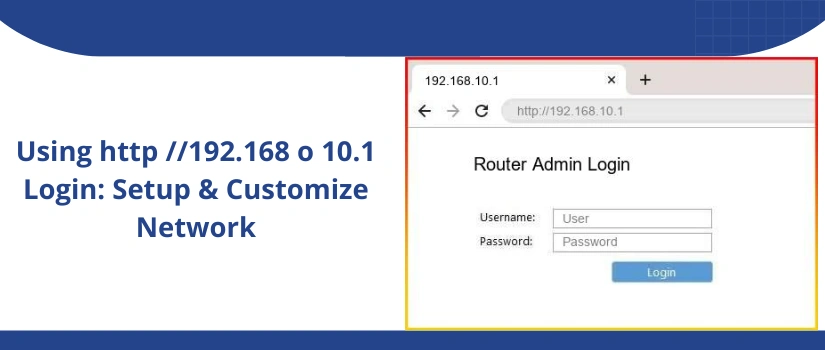
Wish to customize your network? Facing trouble in the network coverage? Don’t worry we have a solution to all your problems simply scroll down and read the information very carefully. Here we specify how you can add a range extender device to your network. Furthermore you will get the detailed information on how you can customize the network settings using the http //192.168 o 10.1 login. Assessing the web interface is very important to configure the extended device network. The assessment process is not as difficult as you thought. Gather the information and follow the process to reach out to the login interface. 

http //192.168 o 10.1 Login Process

  • First of all make sure you are extended device is properly plugged into a power outlet
  • Then second thing you have to verify that the device in which you are about to access http //192.168 o 10.1 login interface is connected to the extenders network. 
  • After very fine both the things you can proceed but the access by launching an internet browser. 
  • Ensure you type the IP address accurately into the browser’s address bar. 
  • When you reach out the page then you have to enter the login details. 
  • New users can use the default details and the users who switch out the details before have to use the updated details. 
  • Press the login option to get access to the page. 

Set Up Extender Using Login Interface 

To configure your extended device using the http //192.168 o 10.1 login interface you have to get access to the interface first by following the above specified process. There after follow the below mention steps: 

  • When you get the access you have to choose to set up a new extended option. 
  • Thereafter you have to proceed with the instructions specified by the screen. 
  • Link the router with the extender by entering the router’s network name and password. 
  • Create a network name for your extenders network along with the password to keep it secure. 
  • Wind up the setup process by submitting the changes. 
  • Don’t forget to test the new network to verify the placement of the extender.
  • If needed you can relocate the extender device to a new location. 

Customise Your Network 

Using http //192.168 o 10.1 login, customize your network by following these steps. Here are the changes to do with the access of the extender’s interface: 

  • Change network name 
  • Change network password 
  • Enhance security 
  • Create guest network (if you are extender support)
  • Update firmware and many other related things. 

Conclusion 

At last I would like to say that with the access of http //192.168 o 10.1 login page you can easily configure a new device, customize your network and perform troubleshooting. With the above specified steps accessing the login interface becomes more easy. Yet in case you got stuck somewhere while performing the setup or troubleshoot or customising your network you can reach out to our technical team for help. 

Disclaimer:- wifiwavlink.net website is for customers who are seeking technical help and technological assistance/support service for WiFi extenders, routers, and WiFi networks. However, we do not have any endorsement, alliance, or affiliation with any brands neither direct nor indirect. All the images, brand names, product models, and logos are only for illustrative purposes. Guidelines provided on the website are solely for informational purposes. Neither a guarantee nor an implied warranty is provided regarding the content available on the website.