How To Fix Wavlink Extender Firmware Update Issues
Wavlink extenders are a most common networking device that are found in almost all the households and office spaces. All thanks to the need for consistent wifi connectivity in every single corner. But as we all know to make the best possible use of any networking device, keeping its firmware to the recent version is extremely important. Now there are many users, especially those who are not tech-savvy, find the updation process a bit complex and difficult to understand. Moreover if they face any additional challenge during the installation of the firmware, it leads to even more frustration and anger. So to eradicate all such issues, we have come up with this troubleshooting blog-post. With its help you can easily eliminate Wavlink extender firmware issues.
Common Firmware Update Problems
Although firmware updates itself helps to solve many problems with the extender like that of slow speeds, intermittent internet connection, security issues and much more. But sometimes several issues might pop up during the firmware upgrade process. These issues can be:
So if you are also facing any such issues, then you no need to panic as these issues are not uncommon. Therefore they are easily resolvable.
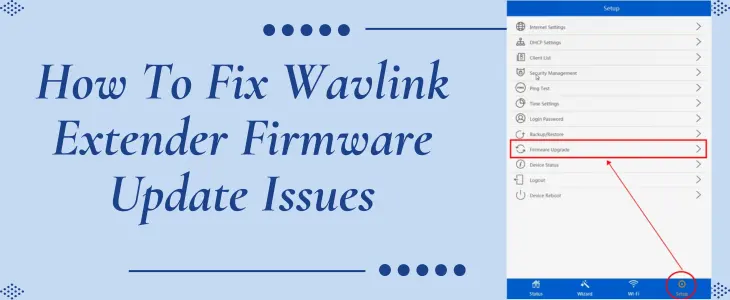
Steps to Update Wavlink Firmware Properly
Follow these below-written steps very precisely one by one to complete the firmware installation process without any interruptions:
✓ First up, take up your Wavlink range extender. On its product label you’ll find the accurate model number. Note it down.
✓ Thereafter visit the official Wavlink website. From hereon move to the Support or Download section. Now search for the updates by entering your specific model number. As and when you get hold of it, click on download.
✓ As the download completes, directly with the help of an Ethernet cable connect your Wavlink extender to the device on which you have the firmware file.
✓ Moving further, open up an internet browser. Head towards the address field. In it fill up 192.168.10.1. Click Enter. Thereafter fill up the details and tap on Login.
✓ After this, go to the Advance Option. From the list select Firmware Upgrade option. Then tap on Browse. Finally, choose the downloaded file. Then tap on Upload. As soon as you click on the upload option, the installation begins. It will take some time to complete, so meanwhile do not turn off the power or click any button on your device. As then this will create an issue.
✓ Lastly, when the installation completes, your Wavlink extender will restart itself to apply all the changes.
Troubleshooting Points
Although by following above written steps precisely the Wavlink extender firmware upgrade issues won’t pop up. But if it does, then consider these two below written troubleshooting points.
✓ Firstly give rebooting a try. As a simple reboot holds the power to fix both minor as well as major glitches. So to reboot the device, you need to consider these points:
With this restart there are high chances that the firmware upgrade issue will no longer be available. But if it persists then factory reset becomes essential.
✓ Resetting basically cleans up all the customization that you must have done with the settings. To be precise your range extender reverts back to the same condition as if you just bought a brand new one. So to reset the Wavlink wifi signal booster consider these points:
Now redo the setup and upgrade the firmware.

