Wavlink AC2100 Setup
Live Chat
Live Chat With Experts and Get Real-Time Responses.
Let’s Talk
Don’t Wait, Then You Can Call Us Right Away.
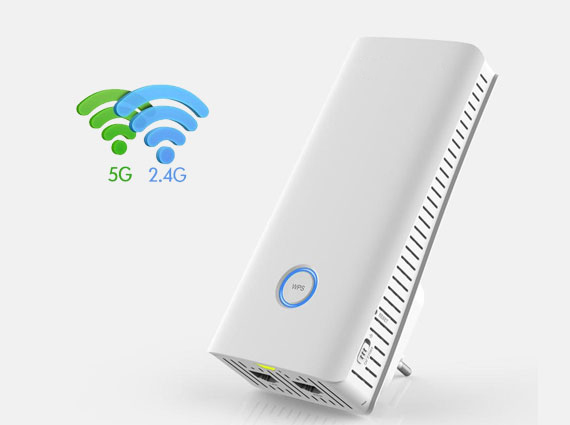
Wavlink AC2100 setup is the easiest way to extend the range of WiFi signals in the house or in the office. It also helps to eliminate all the dead spots. You can easily configure this device by yourself once you get familiar with the Wavlink AC2100 setup process. Let’s start the configuration process of the Wavlink AC2100 device.
Wavlink AC2100 Setup By WPS
To do the Wavlink AC2100 setup without using any web browser or the extender’s login and other details, use its WPS button.
- First, you will need to locate your Wavlink AC2100 extender near the host router
- Now, place the power plug of the Wavlink AC2100 extender in the electrical socket.
- After that, push and hold the router’s WPS button.
Note: While doing this process, make sure your router has the WPS button. If your router does not have it then replace your old router with a new one.
- Next, push and hold the extender WPS button within 2 minutes.
- Further, wait for a few minutes to see a solid blue LED on both the extender and router device.
- As a result, with the help of these few tips, your Wavlink AC2100 setup is successfully done.
How To Log in to the Wavlink AC2100 Extender?
Simply follow the steps below to do the Wavlink AC2100 setup.
- Initially, place the power plug of the Wavlink AC2100 extender in a power socket. Now for the connection, you can either do it with the help of a cable or wirelessly.
- For the connection, you will need to turn on your WiFi. Now, look for the SSID of the Wavlink AC2100 product on a WiFi device such as a laptop, smartphone, computer, etc. After that, link the device to it.
- ‘Wireless N’ is the default network name for the 2.4GHz frequency band. On the other hand, ‘Wireless AC’ is the default network name of the 5GHz band.
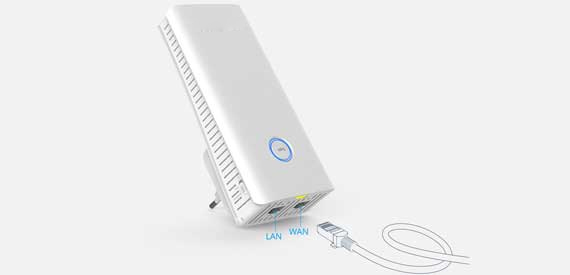
- For the wired connection, use a cable, connect one end of an Ethernet cable to the laptop, PC, computer, etc. Also, connect the other end of the Ethernet cable to the LAN port of the Wavlink AC2100 extender device. After this, you will easily be able to do the Wavlink AC2100 setup of the extender.
- Further, open a web browser on a laptop or computer and enter the IP address 192.168.10.1 in the search bar. Now, fill in the login credentials.
- As you complete the login process, the Wavlink AC2100 setup window will appear on the screen.
- After that, from the login page, pick a region. To protect your WiFi network, it is a good idea to create a new login password that is very hard to guess. To do this, consider the rules that are shown on the page.
Configure Wavlink AC2100 Extender By Web Browser
Apart from that WPS Wavlink AC2100 setup approach, you can use the web setup portal. Study the steps for a successful and hassle-free setup process.
- First, you will need to open an internet browser on your networked device to access the Wavlink AC2100 setup page.
- Then, enter the web or IP address of the extender, that is 192.168.10.1, in the location bar.
- Now, enter the username and security password in the required blanks.
- By doing this, you will visit the Wavlink AC2100 setup page.
- Choose the extender network from the wireless network list and click on the extend button.
- In the end, follow all the configuration instructions that are shown on the display.
- Later, you can create the new SSID network name and set a strong password for it.
Wavlink AC2100 Setup By Access Point
- First, connect an Ethernet cable to the LAN port of the Wavlink AC2100 extender and attach the other end of the cable to the LAN port of the host router.
- After that, launch an updated web browser and enter the IP address 192.168.10.1 in the search bar.
- Doing so will redirect you to the Wavlink AC2100 setup portal on that web browser.
- Now, pick up an access point mode from the screen page and tap on next.
- Further, for the new access point mode, create an SSID and password.
- Finally, observe all the on-screen instructions to complete the Wavlink AC2100 setup process.
Wavlink AC2100 Setup Through App
In any case, if you fail while doing the Wavlink AC2100 setup by the above-mentioned methods, choose another one. That is through the Wavlink WiFi app.
- Unlike those processes, this method requires installing the Wavlink WiFi app on a mobile.
- So, choose your preferred mobile and get the Wavlink WiFi app on that.
- Select the official and latest app from your device’s app store.
- Then, open the app and accept its terms and conditions for the further Wavlink AC2100 setup process.
- In the next step, log in to the extender by inserting the default login credentials.
- As a result, the setup window will be accessible to you on the next page.
- Open the wireless network list and choose your own network from there.
- Insert the network password and click on the extend button.
- Finally, use the screen directions to complete the Wavlink AC2100 setup process.
Troubleshoot Wavlink AC2100 Working Issues
After doing the Wavlink AC2100 setup, if you are facing an error with its working. To remove the issue, consider these tips.
- First, you will need to check the setup LED and just try to identify the trouble source.
- Try moving the extender closer to the router and the networked device.
- Power cycle your extender and router once, and connect the extender again
- Eliminate all the extra gadgets that connect to your network.
- Try to pick different placements and different web browsers during the Wavlink AC2100 setup process.
- Check the distance between the extender and the router device.
- Also, keep those things away that can cause signal interference.
- Check the extender configured and advanced settings after completing the Wavlink AC2100 setup process.
- Make sure there is a strong connection between your extender and your device.
- The wireless network must be chosen accordingly, and the wire must not have a sign of wear or tear.
- The web browser of the connected device must be updated and cleared of cookies and caches.
Note: After trying out these troubleshooting tips, if the issue is not solved, then try these extra tips to solve the issue.
Upgrade Wavlink AC2100 Extender Firmware
If none of the above-mentioned solutions work for your extender’s error, then there might be the extender’s firmware might be outdated. So, update the firmware version after checking the updates on the Wavlink AC2100 setup portal.
- First, in the search bar, enter the web address wifi.wavlink.com.
- Now, enter the correct login credentials, which are shown on the display page.
- Go to the extender’s management option after reaching the Wavlink AC2100 setup portal.
- Further, find an administration option, and under that option, look for a firmware update or just similar to that option.
- Get the latest firmware file on your networked PC and save it safely.
- Later, visit the same page again and upload the file to the right option.
- Wait till the Firmware Update process is complete, as this process will take some time.
- Finally, reboot the extender if required and check the network’s performance.
Reset Wavlink AC2100 Extender
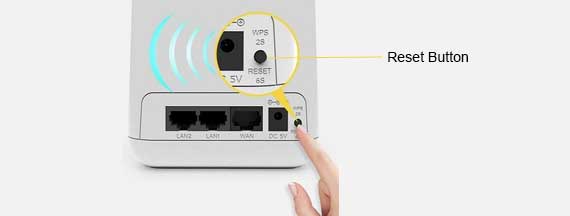
- First, you will need to find the reset button on the extender’s panel.
- The reset button is mainly located on the back side of an extender.
- Now, press that reset button with the help of a paper clip.
- Make sure not to insert the paper clip with pressure; otherwise, your Wavlink AC2100 gadget will be damaged.
- Check the LED color on the extender’s panel to get to know the process’s confirmation.
- Now, wait for a few minutes till the blinking light turns solid and stable.
- After completing the reset process, execute the Wavlink AC2100 setup again using any method from those processes.
We hope, with the assistance of the Wavlink AC2100 setup, you will successfully connect the extender to the router. In case, after trying these troubleshooting tips, if your extender issue is not solved, then try to reach us. We will help you to get the answer to your question.
Common Wavlink Extender Setups
Some Issues You Might Face
If you are facing any issues, please contact us, and we will be happy to help you.
Wavlink Customer Service
FAQs
WPS is a button by which you can easily extend the coverage area of the router in less time.
You will need to verify the WPS settings in the WiFi configuration area of the modem user’s interface. Now, reboot your modem device and try again.
The WPS button is located on the front or back panel of the Wavlink AC2100 extender device. Make sure that while doing this process, your router must have the WPS button.
You will need to push and hold the reset button for 8 to 10 seconds. Wait for a few minutes to see the solid LED from the slow flash. After that, release the button and wait until the router reboots to its factory default settings.