
Rockspace WiFi Extender Setup & re.rockspace.local Login Guide
In today’s digital world, stable network connection has become essential. If you are facing a weak signal problem and looking for a device that can resolve your issue then rockspace WiFi extenders are the perfect option for you. You can easily perform rockspace WiFi extender setup and get a better network. This device is designed to boost coverage and remove that zone issue efficiently. You can enjoy a faster and stable network with the addition of this device to your home networking system. By accessing the re rockspace local web interface you can quickly configure the device without any technical issue. This guide explains everything from Rockspace extender setup to how to connect rockspace WiFi extender properly for smooth performance. You can easily follow the rock space wifi extender setup instructions to complete the configuration.
How Does A Rockspace Extender Work?
A rock space WiFi extender receives signals from your existing router device and then transmits them to the area where your router is not reachable. Rock space AC1200 setup is suitable for you to get a faster speed. Compact models of rockspace like rockspace AC750 setup also works well for basic network coverage. The Rock space AC1200 setup supports both 2.4 GHz and 5 GHz frequency. This device is ideal for streaming and gaming. On the other hand, the rockspace AC750 setup is suitable for everyday browsing and office work. To improve your network coverage you have to connect Rock space WiFi extender accurately. For large homes rock space mesh wifi setup helps to create a seamless network coverage. Configuring a rockspace range extender device is not so hard if you know the rockspace WiFi extender setup process and requirements to initiate the process.
Requirements Before Start Setup
Before initiating the rockspace extender setup you need to ensure you have the access to the rock space wifi extender manual. Whether you are going to use rockspace AC750 or AC1200 models you will get manuals with each. Rock space AC1200 dual band WiFi repeater manual provides you details about the AC1200 and the rock space AC750 manual provides model specific details. To initiate the setup you need a stable router connection, a power source and a phone or computer with WiFi capability along with the user manual.
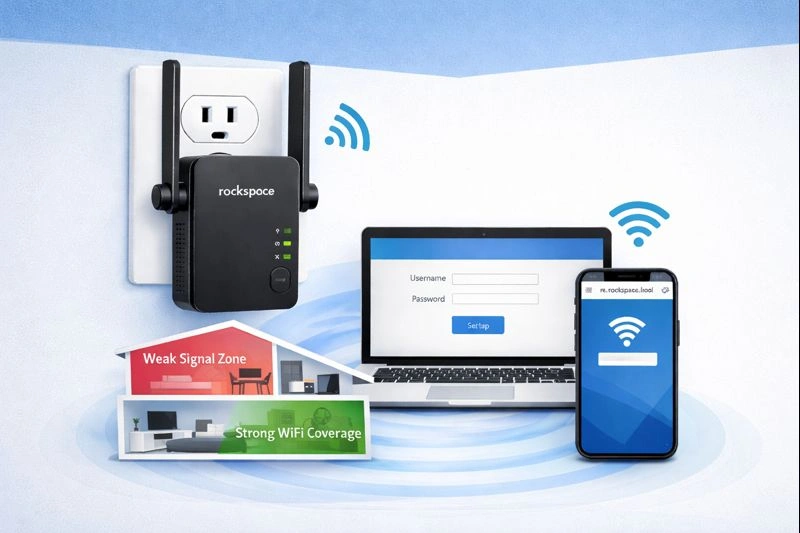
re.rockspace.local Setup- Step By Step
To begin configuration of the range extender device you have to follow the below given rock space wifi extender setup instructions:
Once the settings have been saved your device will reboot itself. As the device reboot your network extension via re rockspace local starts. Now you can enjoy high speed internet all over your space. By following these instructions you can perform rock space ac1200 setup & rockspace ac750 setup also.
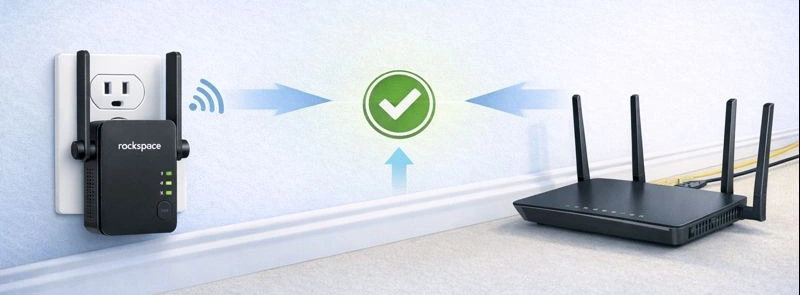
Rockspace WiFi Extender Setup Via WPS
Luckily if your existing router is WPS compatible, you can choose this setup process for your extender. By following the rock space wifi extender setup instructions via WPS you can add the device to your system hardly in 5 to 10 minutes as you will require tapping two buttons on both devices. So, consider these points which are listed below, and carry out the Rockspace extender setup procedure simply.
Thus, the Rockspace WiFi extender setup will be done in this simple way. But, if you face any difficulty during the process, then take assistance from our team of experts. By following these instructions you can perform rock space ac1200 setup & rockspace ac750 setup also.
Rock Space WiFi Extender Login Instruction

To manage the settings after the configuration has been completed you need to access the rock space WiFi extender login page. To get the access of the page you have to follow these instruction:
If the extender is operating in access point mode then you will redirect to the rockspace router login page. Always ensure your device is connected to the extenders network before trying to attempt the access to the login page.
Rock Space WiFi Extender Login Through App
Besides that method, you can prefer to use the Rockspace WiFi app to log in to the extender. Using the app you can also access the rockspace router login page. But, in this process, you will need to get the app on your Android mobile or iOS device.
Troubleshooting Common Errors
Even the best networking devices encounter trouble. You might experience a problem with your rockspace WiFi extender device. Most common problems people reported till now are re rockspace local not working, issue to connect rock space wifi extender, rockspace router login not opening, slow internet speed, frequent disconnections and much more. All these problems can easily be resolved by following the below given tips.
Check Setup Page And Login Details
During the initial Rock space WiFi extender setup, users often face trouble in opening the configuration page. This issue may arise because you are using the wrong web address. While entering the web address you have to make sure you’re typing the accurate address http re rockspace local in the address bar. If the page load proceeds with re rockspace local login using the standard login credentials. Hope you will get the answer to the page easily.
Fix Login And Page Loading Error
If the login page does not open the issue may not be the extender itself. Problems like re rockspace local not working can also occur due to network conflict. Make sure your device is not connected to the mobile data or some other network in which you are going to access the page. Sometimes checking your main router through rockspace router login helps confirm whether the internet source is stable or not.
Follow Proper Setup Instruction
A failed Rockspace extender set UP is usually because people skip the steps while configuring the device. This leads to configuration problems. Always carefully set up Rock space WiFi extender but follow the official rocks space WiFi extenders setup instruction. Keep the extender closer to your router device during the setup to avoid the signal problem.
Choose An Ideal Location
After the Rockspace extender setup, you can relocate it to another place where you want fast internet. This is very important to get a better network all over your space. You can connect rock space wifi extender very easily to your device even from the area where you were facing network concern before. But, the condition here is to keep the extender within the router’s range so that there will be enough signals to transfer. It usually happens when the extender is too far or too close to the router. So, try to move and place the extender in the center of your house.
Get The Firmware Update
Generally, the internet speed becomes sluggish due to the outdated version of the extender’s current firmware. So, make sure your extender is running on the latest firmware file, if it is not, then check the updates. Outdated firmware often creates problems and lead to re rockspace local not working, slow network and more. To check that, access the management window on the Rockspace wifi extender setup portal and choose your extender model. Save that file on your PC and do the firmware updating process on the same window.
Reset The Extender
If your extender behaves unpredictablely or you are facing difficulty with the device then you can resolve the problem and enhance its productivity by performing a rock space wifi extender reset. Performing the rocks space wifi extender setup reset is not a difficult task. You just need to push the reset button on the device for 10 seconds and let the device clear all the incorrect settings. When the device starts up again it gets restored back to the factory setting. Now you can set up rock space WiFi extender again to get a better network.
If you are facing any issues then please contact us, and we will be happy to help you.